Aug 22, 2013

Install SCCM 2012 RTM Step by Step

First let's see the requirements:


  • Server must be part of a Domain
  • AD Schema must be extended. If you are migrating from SCCM 2007 and you have extended it before you jsut need to delegate permissions to the new SCCM 2012 server object.
  • .NET Framework 3.5 and 4 (with WCF Activation)
  • IIS (Webdav is no longer required)
  • Remote Differential Compression
  • BITS
  • SQL Server 2008 SP2 CU 9 or SP3 CU4 or SQL Server 2008 R2 SP1 CU4
  • SQL Server 2008 R2 SP1 CU4 is only supported for secondary sites
Now let's start the installation.


Run the Splash. Click on Install.

Click on Next in the first screen.
Select Install a Configuration Manager primary site. Click on Next.

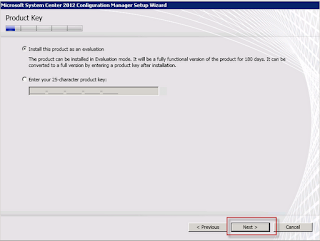
Enter your product key or select to Install this product as an evaluation. Click on Next.

Accept the license. Click on Next.
Accept the licenses. Click on Next.
Choose a folder to download prerequisite files. Click on Next.

Select server the language and click on Next.
Select the client language and click on Next.

Now select a Site code. If you are migrating from SCCM 2007 then you will have to select a new Site code. Select a Site name and click on Next.

In this case I dont have a Central Site so I will install it as a stand-alone site. You will have to decide what type of hierarchy best suite your needs. Click on Next.

Click on Yes.

Choose the Server Name, Database name and click on Next.

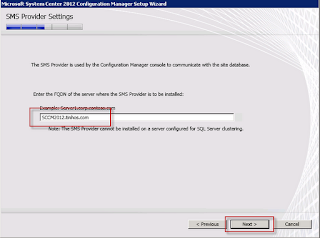
Enter the FQDN of the server where the SMS Provider will be installed. Click on Next.

Select which type of communication will be allowed. If you don't have PKI select the second option. Click on Next.

Select whether you want to install the management point and distribution point and to which servers they should be installed on. Click on Next.

Select if you want to join the CEIP and click on Next.
Now revise the summary and click on Next again.
Now setup will check for any problems.
If you get any warnings related to memory you can resolve them in the SQL Server Management Studio.
Right click in the database and select Properties.

Now change the minimum and maximum server memory and click on OK.

If you Run Check again the warnings will disappear.
If you get an error around the server collation, you will have to replace the current collation.
Note: Don't do this is if you don't know what you are doing.
You can change the collation as below, just make sure to change the INSTANCENAME and the user for sqlsysadminaccounts.


If you get the warning about WSUS just install the full WSUS 3.0 SP2 or just the console.
After you fix all errors and warnings click on Begin Install. Warnings are not required to be fixed but are recommended.

If everything goes well you should get the screen below.

Side-by-Side migration from SCCM 2007 to SCCM 2012


Start the SCCM Console.
Click on the Administration Workspace. Expand the Migration folder and click on Specify Source Hierarchy.
Type the name of your top-level primary site server. 
 
Specify a new account which has the required permissions to access the SMS Provider in the SCCM 2007 site server.
If the chosen account has the required permissions in the SQL server select to use the same account otherwise specify a new account.
Click OK.
The data gathering can take some time depending on the number of objects in your SCCM 2007 site.
After if finishes gathering all the data you should see something like this:
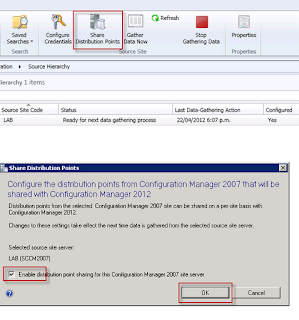
Now let's Share the DPs. Click on Share Distribution Points, tick the Enable distribution point sharing for this Configuration Manager 2007 site server.
Click OK.
When it's done click on Close.

If required the Data gathering interval can be changed clicking on Properties and selecting a different interval.
Now let's create a Migration Job.
There are 3 different Job types:

Collection migration. With this option you can migrate everything that's related to collections. This include collections, packages, virtual packages, software updates, OS packages, images and boot images, task sequences, configuration baselines and configuration items.

Object migration: All objects that can be migrated except collections. This include boundaries, packages, virtual packages, software updates, OS packages, images and boot images, task sequences, configuration baselines, configuration items, Asset Intelligence and Software metering.

Previously migrated object migration: with this option you can re-migrate objects that have been migrated before.

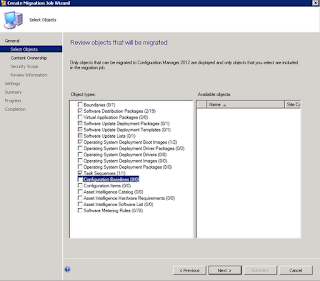
Click on Create Migration Job, specify a name, select Object Migration as the Job type and click on Next.

Now select what is to be migrated and click on Next.


Click on Next.

You can create a new security scope to restric the objects being imported. I will just use the Default. Click on Next.

Now review the migration information and click on Next.
You can schedule the migration or run it straight away. You can also choose whether or not to overwrite objects, transfer the folder structure and enable programs for deployment.
click on Next. 

Review the summary and click on Next. Then click on Close.

Make sure the jobs status are complete before proceeding.

After all the migration is done, it's time to upgrade the SCCM Clients.
A prerequisite to get the SCCM 2012 client is to have the .NET Framework 4 installed. So if you don't have it installed go ahead and distribute it using SCCM 2007.
After this is done you can enable Discovery methods, set Boundaries (although this might be already there as part of the migration, but a Boundary group is still required) and enable Client Push Installation.
First let's enable AD Forest Discovery and AD System Discovery.
Select the Administration Workspace and select the Hierarchy Configuration folder. Now select Discovery Methods.
Now double click AD Forest Discovery and Enable it. Click OK and confirm to run a full site discovery.
Now double click AD System Discovery and enable it. Select the container from where it will discover the objects. Click OK, OK and confirm to run a full discovery.

Now let's create a Boundary Group. Click on the Boundary Groups node and select Create Boundary Group.
Now name it and click on Add to add the boundaries to the group. Select the boundaries click on OK and OK again.

Now we can enable the Client push. 
Expand the Site Configuration folder and select Sites. Click on the Client Installation Settings and Client Push Installation.
Tick the Enable automatic site-wide client push installation, specify the account that will be used to install the client and any Installation Properties of your choice.
Click on OK.


After all the clients have been upgraded is time to upgrade the Distribution Points.
First let's check if the DPs are upgradable.
Click on Source Hierarchy under the Migration folder and click on Shared Distribution Points tab.


As you can see in my example the Distribution Point can't be upgraded because it is in the same server as the site server. The only role a Distribution Point server can also have is a Proxy Management Point. So if you have DPs that cant be migrated you must remove the other roles before upgrading them.
But because you migrated all you packages now another option is to delete the Distribution Point from the SCCM 2007 site and create a new Site Server in the SCCM 2012 infrastructure with the DP role.

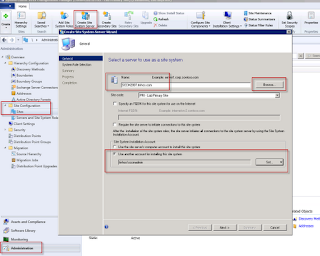
Click on the Administration Workspace, select the Sites node under the Site Configuration folder. Click on Create Site System Server. Browse to the old SCCM 2007 DP and set the account which will be used to install the site system.

Select the Distribution Point role. Click on Next.

Select Install and Configure IIS and Enable prestage content and click on Next.

Specify drive settings as required.

Enable PXE boot if required.

Enable multicast if required.

Enable content validation if required.

Specify boundary groups if required.

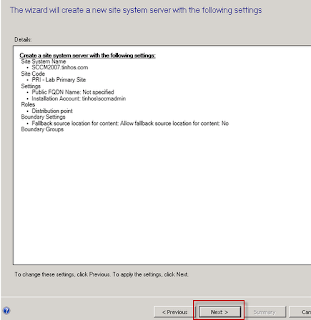
Review the settings.


Now you can distribute the migrated packages to the DP or create Prestaged Content and extract them to the DP using the ExtractContent.exe command line utility.

Aug 21, 2013

AD data to SCCM reporting


First off, this will not be supported by Microsoft or me. :-)
AD it just another database, just like SQL server is. With that in mind there is nothing stopping you from using SQL to link to AD to give you data about your AD environment!
1) Create Linked Server using SSMS
exec master.dbo.sp_addlinkedserver ‘ADSI’, ‘Active Directory Service Interfaces’, ‘ADSDSOObject’, ‘
2) Modify the security for ADSI using SSMS
exec master.dbo.sp_addlinkedsrvlogin @rmtsrvname = N’ADSI’, @locallogin = NULL ,@useself = N’False’, @rmtuser = N’\', @rmtpassword = N”
3) The hard part is over!
4) Create query to query AD and ConfigMgr
This query will list all PCs within AD that are NOT within ConfigMgr (or SMS)
select
AD.cn as ‘PC Name(AD)’,
AD.operatingSystem as ‘OS (AD)’,
AD.operatingSystemServicePack as ‘SP (AD)’
from
openquery (ADSI,
‘SELECT cn,
operatingSystem,
operatingSystemServicePack
FROM ”LDAP://
WHERE objectCategory = ”Computer”’) as AD
Where
AD.cn not in (Select name0 from v_GS_Computer_System as CS)
order by
AD.cn,
AD.operatingSystem,
AD.operatingSystemServicePack
This query will give you a count of all OS that are NOT within ConfigMgr (or SMS)
select
AD.operatingSystem as ‘OS (AD)’,
count(AD.operatingSystem)
from
openquery (ADSI,
‘SELECT cn,
operatingSystem,
operatingSystemServicePack
FROM ”LDAP://gartek-dc.gartek.tst”
WHERE objectCategory = ”Computer”’) as AD
Where
AD.cn not in (Select name0 from v_GS_Computer_System as CS)
Group by
AD.operatingSystem
order by
AD.operatingSystem
So what does this report look like.
image
Now for the bad news!
While researching this there was some indication that AD will only return 1000 records! There was also some indication that there are some complicated queries out on the Internet to solve this problem but I did not find them. So…

Migrate reports from SCCM 2007 to SCCM 2012 SP1

The built-in migration wizard in ConfigMgr 2012 can migrate most objects but not reports. In ConfigMgr 2012 classical ASP reports (as we know them from earlier versions) are no longer supported.

Migrate the classical reports to SQL Reporting Services in SCCM 2007

Below is a walk thru of how you migrate your existing classical reports to SQL reporting Services in SCCM 2007. Notice that you will still be able to run all classical reports after the migration.
  1. On you SCCM 2007 site server install either SCCM 2007 R2 or SCCM 2007 R3, both will add SQL Reporting Services support for SCCM 2007.
  2. In the ConfigMgr. console, navigate to Site Database, Site Management, A01 (where A01 is the sitecode), Site Systems. Right click the Site system server that will become a Reporting Services Point and click New Roles. Select Reporting Services Point and finish the wizard using the default values.
  3. In the ConfigMgr. console, navigate to Site Database, Computer Management, Reporting, Reporting Services, and expand the node.
  4. Right-click SCCM1 (where SCCM1 is the name of your server), and then click Properties.
  5. On the Data Source Settings tab, specify SCCM1 as the database server and SMS_A01 as the database name (where SMS_A01 is the name of your SCCM 2007 database. Click Test.
  6. On the Data Source Authentication tab, select Windows integrated security.
  7. Click OK

Copy reports to SQL Reporting Services

  1. Right-click SCCM1, and select Copy Reports to Reporting Services.
  2. On the Data Source Settings page, accept the default settings, and click Next.
  3. On the Data Source Authentication page, accept the default settings, and click Next.
  4. On the Select Reports page, accept the default settings, and click Next.
  5. On the Security page, accept the default settings, and click Next.
  6. On the Summary page, click Next.
  7. On the Progress page – once all of the reports have copied – click Next and then click Close.

Migrate the SCCM 2007 reports to SCCM 2012

You can’t use the built-in migration tools to migrate reports from SCCM 2007 to SCCM 2012. This leaves you with two choices; 1) Download each RDL file one by one from SCCM 2007 and upload them to SCCM 2012 or 2) Use one of the free community tools that can download multiple folders at the time. In my last project I used this tool – ReportSync – to assist me.
  1. Launch ReportSync
  2. In Source server type in the name of the SCCM 2007 Report server in form of http://CM01/ReportServer. Provide credentials and click Load
  3. In Destination server type in the name of the SCCM 2012 Report server in form of http://CM02/ReportServer. Provide credentials and click Load image
  4. Select the folders or individual reports you want to migrate.
  5. Select the Tools menu and click Map Datasources. Select the Destination data source, click Set and OK. image
  6. Click Sync
    image
  7. Once the process is finished click OK and your reports are now ready in SCCM 2012.
  8. Run the report and verify that it works. There is no guarantee the all SCCM 2007 reports work out of the box in SCCM 2012.
    image