This looks like it is coming from the Root management server, but the details give you a GUID to the actual server with the error. It looks like this:
Details:Health service ( 168645A4-6B9C-31C6-801D-11B6B355091D ) should not generate data about this managed object ( F227C8F1-E50E-F847-9378-45EB7135B901 )
In order to get the actual name of the monitored device you need to use PowerShell. Don't use the PowerShell that you find in Programs -> WindowsPowerShell 1.0 since this does not have the SCOM snap-in included. Go to Programs -> System Center Operations Manager 2007 -> Command shell then execute the following command. Replace the GUID with the one that your alert specifies.
Get-MonitoringObject -id:'FED0B867-F9AE-ACAF-4CCF-311DD92789C9' | ft DisplayName
Then to enable Proxying:
Access the Administration Node and locate the agent under Agent Managed. Right click the node you found after you execute the above command. Select Properties. Click the Security tab. Check Allow this agent to act as proxy…

Jan 27, 2010
Jan 26, 2010
SC Operations Manager 2007 SP1 - Configuration Steps: SCOM2k7 Basic Service Monitor with a Diagnostic and a Recovery for a Stopped Service

Here are the general steps:
- Focus the Monitor Console on the 'Windows Computer' object.
- Generate a Basic Service Monitor against the Print Spooler Service as a Critical Alert when the Service Stops for all Windows Computers.
- Generate a Diagnostic that automatically lists all Applications and Process IDs during the time the Service Stops.
- Generate a Recovery that automatically starts the Print Spooler Service and clears the Critical Alert.


Flushing the Health Service and State and Cache
What really happens when the when you run this task?
So we start the task by clicking on the ‘Flush Health Service State and Cache’

Then you are ask to confirm the settings and run the task.

Note in the Task description
Task Description
Status: Failed This task will reset all state in the Health Service.
This includes the state of rules, monitors, outgoing data, and cached
management packs. Since this task will reset the service, status of
this task will not be delivered since outgoing task status is part
of what is reset by this task.
This, even though a little unclear is saying that the task is by design going to show up as a failure.
Let’s have a look at was is really happening. When you run the task it may take a long time to finish.

So when the task is running the targeted machine will with e-mail notifications shows up as below.

Then shows as health in ‘Computers’ in the Monitoring Pane
But the task can still run. In fact for a very long time it just keeps going.

I find Event 29103 and the fact the agent has contacted the MS and downloading the config.

As well as 29102.

But the Task is still running! Is this right?
If we do the task manually then we stop the Health Service (Net stop HealthService )
Go to the the Heath Service Store
C:\Program Files\System Center Operations Manager 2007\Health Service State\Health Service Store
Delete all in it ( will not be able to delete the files when the Health Service is running

Then start the HealthService again and the Cache is cleared.
So why does are Task show up as a failure?
What happen the task is run against the current Health Service Store but in fact is deleted so the task cannot complete.
As the new Health Service Store as no knowledge of the task being run, hence it fails.
Conclusion
When you next run the ‘Flush Health Service State and Cache’ check the Ops Mgr Event Log on the target for Event 102
to show that a new Instance has been started to confirm the task really did complete.
Simon Skinner
Управление драйверами в Operating System Deployments System Center Configuration Manager 2007

Чтобы Configuration Manager 2007 мог работать с драйверами, необходимо вначале внести их в базу драйверов. Сделать это можно через консоль администрирования Configuration Manager Console: Site Database –Computer management – Operation system deployment – Drivers – Import. Для удобства администрирования вы можете создавать в структуре Drivers обычные папки или папки поиска. Если с режимом обычной папки, я думаю, вопросов не возникнет, то режим папки поиска (Search folder) - это хорошо известные нам еще по WSUS виртуальные папки, которые динамически формируют свое содержимое в зависимости от заданных в настройках условий. Например, все драйвера, название которых содержит слово «Intel». Это было небольшое лирическое отступление.

Импорт драйверов
Итак, для того чтобы добавить драйвер в базу SCCM выбираем пункт «Import» и в появившемся мастере выбираем способ добавления драйверов «Импортировать все драйверы из следующего сетевого папки» (Import all drivers in the following network path (UNC)). Второй доступный вариант позволяет выбрать отдельный файл драйвера. Естественно добавлять мы можем файлы либо в формате inf либо в формате txtsetup.oem.
После нажатия клавиши Next SCCM 2007 произведет поиск доступных файлов описания драйверов в папке и выведет их список. При это вы можете исключить не нужные драйверы, снимая галочки с записей.
Также вы можете задать категорию драйверов. Применение категорий драйверов значительно облегчает их поиск и применение в Task Sequence, это скорее инструмент фильтрации. Именно категориями драйверов вы будете оперировать в шаге «Автоматическое применение драйверов « (Auto Apply Driver) Task Sequence. Чтобы задать категорию нажмите кнопку Categories и в появившемся окне либо отметьте уже существующие категории, либо создайте новые. Способ фильтрации и соответственно разбития категорий зависит только от вас. Это может быть деление на драйвера:
- сертифицированные для работы с Windows и тестовые драйвера от производителя
- драйвера по производителям компьютеров
- по типам оборудования

На следующем шаге нам необходимо выбрать пакет, в который будут входить данные драйвера. Все драйвера должны входить в пакеты и быть распространенными на точках обновления для того чтобы клиент мог их установить входе развертывания ОС. К созданию пакетов драйверов стоит подходить более ответственно, чем к созданию категорий.
Чем отличаются пункты Apply Drive Package и Auto Apply Drivers в Task Sequence?
Apply Drive Package копирует все драйверы пакета на клиент, вне зависимости от того, нужны они клиенту или нет. Когда их следует применять:- оборудование еще не подключено к компьютеру (например, принтеры);
- устройство не поддерживает PnP;
- драйверы контроллеров дисков, при развертывании систем с ядром ниже NT 6;
- когда необходимо установить на клиента определенный драйвер, а не лучший, по мнению Windows;
- если у нас очень большая база драйверов, то используя пакеты драйверов для определенных моделей компьютеров (например ноутбуков) мы уменьшаем время установки ОС за счет отказа от поиска по всей базе драйверов;
Также необходимо учитывать операционные системы, которые вы собираетесь распространять. Для Windows XP \ Windows 2000 существует ограничение на 150 драйверов для пакета. В реальной жизни, я сталкиваюсь с ситуацией, когда Task Sequence вызывает ошибку при попытке копирования 145 по счету файла драйвера на клиент.
date="10-14-2008" component="OSDDriverClient" context=""
type="0" thread="1664" file="driverinstaller.cpp:424">
date="10-14-2008" component="OSDDriverClient" context="" type="1" thread="1664"
file="driverinstaller.cpp:312">
type="0" thread="1664" file="driverinstaller.cpp:424">
date="10-14-2008" component="OSDDriverClient" context="" type="0" thread="1664"
file="sysprepdriverinstaller.cpp:246">Напомню, что драйверы должны обязательно входить в какой-либо пакет. Если существующие пакеты вас не устраивают, можно создать новый пакет, нажав на кнопку «New Package».
 В появившемся окне задаем имя и комментарий к пакету, а так же сетевой путь, в который будет содержать файлы драйверов.
  После нажатия кнопки OK пакет драйверов появится в окне выбора и будет отмечен галочкой. Не забывайте обновлять пакеты драйверов на точке распространения!
  На следующем шаге мастера мы можем добавить драйвера к загрузочному образу Windows PE. Чаше всего такая необходимость возникает, когда на клиенте установлена сетевая карта, которая не поддерживает стандартные драйвера WinPE, либо когда необходимо указать драйверы для контроллера дисков. Не стоит увлекаться и добавлять драйвера к загрузочным образам просто на всякий случай. Любое добавление драйверов увеличивает объем памяти, который будет занимать среда Windows PE на клиенте.
Как увидеть драйвера которые входят в состав загрузочного образа?
В консоли администрирования Site Database –Computer management – Operation system deployment - Boot перейдите к интересующему вас образу и нажмите кнопку свойства. На вкладке Windows PE вы увидите, какие драйвера будут использованы данным загрузочным образом. Сможете добавить или удалить необходимый драйвер. После нажатия кнопки Next и просмотра итоговой страницы мы видим процесс добавления драйверов в базу.
 Теперь драйвера добавлены в базу Configration Manager 2007 и отображаются в консоли администрирования. Выделив все или часть драйверов, мы можем отсортировать их по разным папкам.
  При нажатии на правую кнопку мыши появляется контекстное меню, в котором мы можем выключить драйвер, добавить или удалить его из пакета или образа загрузки, а также перенести в другую папку. В данный момент нас интересует кнопка Свойства.
  Самой интересной является вкладка Applicability. На ней задаются поддерживаемые платформы, а также модели оборудования, для которых применим данный драйвер.
Добавление драйверов в Task Sequence
После того как мы добавили драйвера в базу SCCM перейдем к тому, ради чего, собственно все и затевалось – к настройке Task Sequence. Пункты работы с драйверами добавляются в Task Sequence через меню Add-Drivers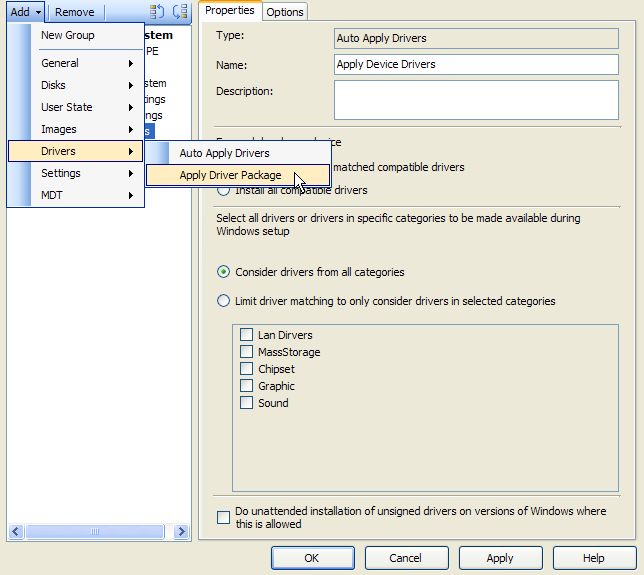 Рассмотрим добавление пакета драйверов. Выбор применяемого пакета доступен через кнопку Browse пункта Driver Package. Кроме того нам доступны два параметра, это выбор драйвера для контроллера дисков (Select the mass storage driver…) и поведение с неподписанными драйверами (Do unattended installation…).
  Одной из «фишек» Task Sequence является возможность применять его пункты, только когда они соответствуют определенному условию. Например, в случае с драйверами мы можем указать несколько пакетов, и WMI запрос, который будет проверять, соответствует ли компьютер определенному критерию - производитель или модель материнской платы.
 При выборе автоматической установки драйверов, мы можем указать для поиска всю базу или только определенные категории. Кроме того, доступен выбор установки всех драйверов или только совместимых, а также поведение при работе с неподписанными драйверами.
Subscribe to:
Posts (Atom)