
Start the SCCM Console.
Click on the Administration Workspace. Expand the Migration folder and click on Specify Source Hierarchy.
Click on the Administration Workspace. Expand the Migration folder and click on Specify Source Hierarchy.

Type the name of your top-level primary site server.
Specify a new account which has the required permissions to access the SMS Provider in the SCCM 2007 site server.If the chosen account has the required permissions in the SQL server select to use the same account otherwise specify a new account.
Click OK.

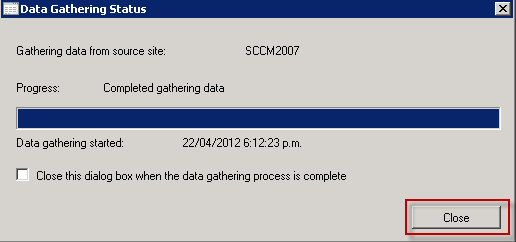
The data gathering can take some time depending on the number of objects in your SCCM 2007 site.
After if finishes gathering all the data you should see something like this:
Now let's Share the DPs. Click on Share Distribution Points, tick the Enable distribution point sharing for this Configuration Manager 2007 site server.
Click OK.When it's done click on Close.

If required the Data gathering interval can be changed clicking on Properties and selecting a different interval.

There are 3 different Job types:
Collection migration. With this option you can migrate everything that's related to collections. This include collections, packages, virtual packages, software updates, OS packages, images and boot images, task sequences, configuration baselines and configuration items.
Object migration: All objects that can be migrated except collections. This include boundaries, packages, virtual packages, software updates, OS packages, images and boot images, task sequences, configuration baselines, configuration items, Asset Intelligence and Software metering.
Previously migrated object migration: with this option you can re-migrate objects that have been migrated before.
Click on Create Migration Job, specify a name, select Object Migration as the Job type and click on Next.

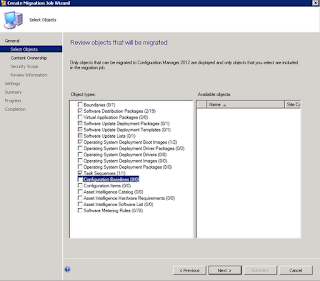
Now select what is to be migrated and click on Next.
Click on Next.

You can create a new security scope to restric the objects being imported. I will just use the Default. Click on Next.

Now review the migration information and click on Next.

You can schedule the migration or run it straight away. You can also choose whether or not to overwrite objects, transfer the folder structure and enable programs for deployment.
click on Next.
click on Next.

Review the summary and click on Next. Then click on Close.

Make sure the jobs status are complete before proceeding.

After all the migration is done, it's time to upgrade the SCCM Clients.
A prerequisite to get the SCCM 2012 client is to have the .NET Framework 4 installed. So if you don't have it installed go ahead and distribute it using SCCM 2007.
After this is done you can enable Discovery methods, set Boundaries (although this might be already there as part of the migration, but a Boundary group is still required) and enable Client Push Installation.First let's enable AD Forest Discovery and AD System Discovery.
Select the Administration Workspace and select the Hierarchy Configuration folder. Now select Discovery Methods.
Now double click AD Forest Discovery and Enable it. Click OK and confirm to run a full site discovery.
Now double click AD System Discovery and enable it. Select the container from where it will discover the objects. Click OK, OK and confirm to run a full discovery.

Now let's create a Boundary Group. Click on the Boundary Groups node and select Create Boundary Group.

Now name it and click on Add to add the boundaries to the group. Select the boundaries click on OK and OK again.

Now we can enable the Client push.
Expand the Site Configuration folder and select Sites. Click on the Client Installation Settings and Client Push Installation.
Tick the Enable automatic site-wide client push installation, specify the account that will be used to install the client and any Installation Properties of your choice.Click on OK.

After all the clients have been upgraded is time to upgrade the Distribution Points.
First let's check if the DPs are upgradable.
Click on Source Hierarchy under the Migration folder and click on Shared Distribution Points tab.

As you can see in my example the Distribution Point can't be upgraded because it is in the same server as the site server. The only role a Distribution Point server can also have is a Proxy Management Point. So if you have DPs that cant be migrated you must remove the other roles before upgrading them.
But because you migrated all you packages now another option is to delete the Distribution Point from the SCCM 2007 site and create a new Site Server in the SCCM 2012 infrastructure with the DP role.
Click on the Administration Workspace, select the Sites node under the Site Configuration folder. Click on Create Site System Server. Browse to the old SCCM 2007 DP and set the account which will be used to install the site system.

Select the Distribution Point role. Click on Next.

Select Install and Configure IIS and Enable prestage content and click on Next.

Specify drive settings as required.

Enable PXE boot if required.

Enable multicast if required.

Enable content validation if required.

Specify boundary groups if required.

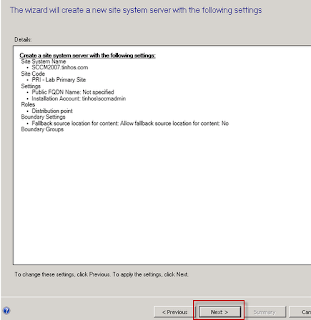
Review the settings.
Now you can distribute the migrated packages to the DP or create Prestaged Content and extract them to the DP using the ExtractContent.exe command line utility.
No comments:
Post a Comment