Dec 30, 2010

Installing SCOM 2007 R2 on a SQL 2008 Instance with all Windows Firewalls Enabled.

I decided I needed to re-install my lab environment.  I wanted to keep all of the firewalls on during the install process and only open the ports that are actually needed. I installed SQL using a named instance as many customers use a SQL 2008 cluster.

After I installed the SCOM database on the SQL 2008 server with all firewalls on.  I created a firewall rule to let port 1433 allow connections.  As specified in the Supported Configurations doc
Root management server 1433 —> OperationsManager database
1
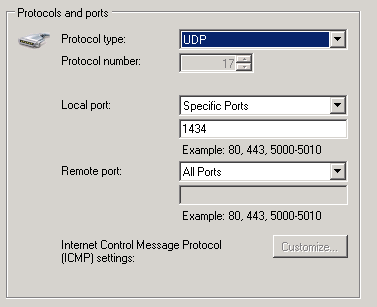
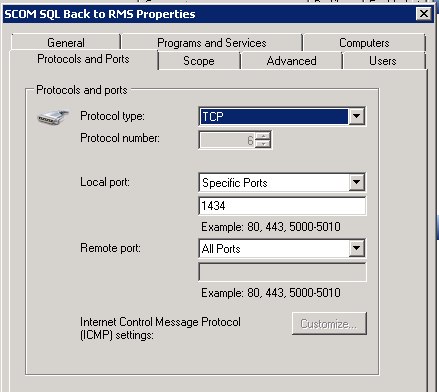
I also setup a firewall rule to allow port 1434 back to the RMS server from the SQL Instance Server. (Also in the guide)


Root management server 1434 UDP < — OperationsManager database
2
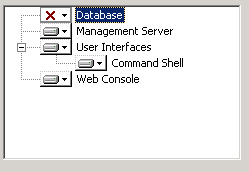
I start the install of SCOM to the RMS server.  I unchecked Database as my database is already install the on the SQL instance.
3
I typed in my SC Database Instance Name and clicked Next
4
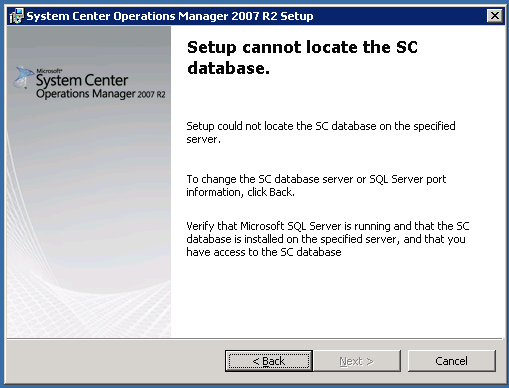
But I got this error “Setup cannot location the SC database”
5
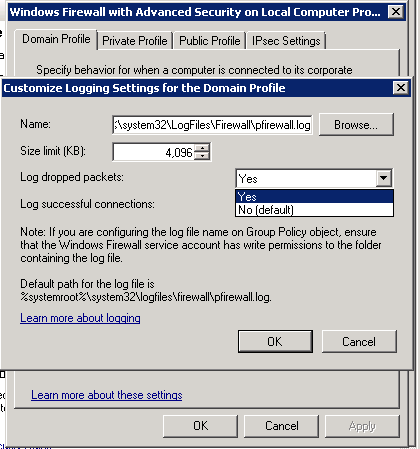
So I enabled firewall logging to see what was getting dropped blocked by setting the firewall to log dropped packets.
6

In the SCOM setup I clicked back and then next.
I checked the firewall logs in %systemroot%\system32\Logfiles\Firewall\pfirewall.log  and it looks like UDP port 1434 is being dropped

date time action protocol src-ip dst-ip src-port dst-port size path
12/26/2010 16:56:54 DROP UDP 192.168.2.63 192.168.2.61 58321 1434 38 RECEIVE

I create another rule on the SQL server to enable UDP port 1434
8

In the SCOM setup I click back and next again.

Once again same failure.  “Setup cannot location the SC database”
Back to the firewall logs.  It now needs TCP port 62756 (Not in the guide)
date time action protocol src-ip dst-ip src-port dst-port size path
12/26/2010 17:12:03 DROP TCP 192.168.2.63 192.168.2.61 50503 62756 38 RECEIVE


I create another rule on the SQL server to enable TCP port 62756
7
After that rule is enabled I am able to continue on a install SCOM successfully with all of the windows firewalls still on.

Installing Opalis 6.3 on Windows 2008 R2

As many of you know Opalis is one of the latest join to the System Center family. Btw the family is growing, take a look at the AVICode solution, if you need to monitor managed code applications and web services this is a must have, it has always been a great product but really expensive, now it’s included in SC Suite licensing and is affordable for everyone.
Let’s return to Opalis, the latest release 6.3, eventually adds support for Windows 2008 R2 and publishes the Integration Packs (IPs) for the whole System Center family (OM, CM, SM, VMM, DPM). This has been a great opportunity to add this technology to my System Center Lab, since the whole setup process hasn’t been so easy I want to share with you dos and donts for installing Opalis on Windows 2008 R2.
A foreword: I’m not a java fan, I don’t like it as a programming language, I don’t believe in the write once run everywhere mantra.  This means that, regarding the JBoss/Java stuff I’m not an expert at all, I will just explain the way I set up my environment, I do not claim this is the only way nor the best one. So it won’t be early enough when Microsoft will move away from JBoss and the LogiXML LGX Report stuff.
A second foreword: Opalis is a great solution, if you haven’t had the chance to take a look at it I strongly recommend you do so. It empowers IT people making easy to design and maintain complex automations without requiring programming skills.
Let’s start with my donts:


  • don’t try to push the whole environment to Windows 2008 R2, only the management server and the action servers with the System Center Integration packs are supported on Windows 2008 R2
  • don’t follow the Technet documentation for securing the Operator Console is you’re using an internal CA, I will explain the entire process later
  • I wasn’t able to install the LGX reporting stuff on Windows 2008 R2, after a trial and error session I gave up when the authentication process refused to work with a method not found error (System.Security.Principal.WindowsIdentity.GetRoles). I would suggest to skip LGX reporting waiting for a SQL Reporting Server solution from Microsoft or install the reporting on Windows 2003 (sigh) where it worked at the first attempt.
And my dos:
  • turn UAC off, the setup should work if run with administrative privileges, but until I turned off UAC I had all sort of errors.
  • only use JBoss 32bit, the whole Opalis dlls are 32 bit so don’t even try to install JBoss x64 (as I first did)
  • use Windows 2003 SP2 (sigh) for non System Center Integration Packs, this means you need to have at least two systems: the management server, database server and action server for SC IPs on Windows 2008 R2; one or more Windows 2003 server for other IPs. Things should improve during 2011, let’s see.
  • you will probably want to run your JBoss process as a service, I used this tool with success on Windows 2008 R2: http://labs.jboss.com/jbossweb/downloads/jboss-native-2-0-9.html. Since the tool is designed for an updated JBoss version I would advice, just for clarity and not for functionality, to modify the bat file with the JBoss version used with Opalis
    REM
    REM VERSION, VERSION_MAJOR and VERSION_MINOR are populated
    REM during the build with ant filter.
    REM
    set SVCNAME=JBAS42SVC
    set SVCDISP=JBoss Application Server 4.2
    set SVCDESC=JBoss Application Server 4.2.3 GA/Platform: Windows x64
    set NOPAUSE=Y
  • Add the JAVA_HOME environment variable to the System variables
  • add the %JAVA_HOME%\Bin path to the System PATH environment variable

Pre-setup steps – Windows 2008 R2

Create the Opalis service account and remember to add it to the local administrators’ group on the Management Server and on planned action servers and clients
Create the Opalis database before running setup, the setup procedure doesn’t give you the chance to configure the DB in terms of size, options and so on. So I would advice to create the DB before running setup, to turn off autogrow and probably to put it in simple recovery mode. Don’t forget to add the Opalis service account as a dbo for the newly created DB.
Always install .net framework 3.5 if you plan to use the System Center Integration Pack, it’s a prerequisite documented in the release notes but you could miss it (as I did). Technically you need the .net framework only on the action servers that are supposed to run the IPs and on the Client used to edit the policies, I would recommend to install it on the management server as well.

Opalis Operator Console

To install the Operator Console follow the Technet instruction, remember to install the 32bit version of JBoss and once installed (copied) remember to splistream Service Pack 1 into it (copy SP1 files into JBoss installation directory). Once you took your time to download all the prerequisites in a sort of treasure hunt, just run the powershell script to setup the Operator Console. This entire process should be smooth and it worked as expected in my case.
To run JBoss as a service see my dos topic, this is something you want to do in a production environment.
To secure the console, again something you want to do since the console is authenticated (the basic way) and users are required to type in their username and password in clear, you can follow the Technet documentation if you’re going to use a public CA, but if you want to use an internal CA you have to perform the following steps. (I copy the relevant part of the technet page and modified the checklist when needed)
At the end of the checklist you will have added a certificate called Opalis (alias) enrolled from an internal CA in its own datastore (opalis). I assume the internal PKI has a standard architecture with a secured root CA and a sub CA used for enrollment.
To generate and prepare a certificate store for the Opalis SSL certificate (alias=Opalis)
At the command prompt, type
  1. "%JAVA_HOME%\bin\keytool" -genkey -alias Opalis -keyalg RSA -keystore "%JAVA_HOME%\jre\lib\security\opalis
  2. At the prompts, provide the following information:
    1. Keystore password. In a default JDK installation the password is changeit if you plan to change the password (good idea) remember to spend the new password anywhere you’ll find "changeit".
    2. First and Last name. Type the fully qualified domain name of the Operator console host computer. This is the only relevant information
    3. Organizational unit
    4. Organization
    5. City
    6. State or Province
    7. Two-letter country code
  3. When prompted for the Alias password, leave it blank and press ENTER. (this way it is identical to the keystore password)
    The certificate is added to the JAVA Opalis certificate store. I prefer to have a separate store, easier to maintain and backup.
To generate a certification authority request file
  1. Type the following command:  "%JAVA_HOME%\bin\keytool" -certreq -alias Opalis -keyalg RSA -keystore "%JAVA_HOME%\jre\lib\security\opalis" -file opalis.csr
  2. You will also be asked for the keystore password. In a default installation of the JDK and in our example the password is changeit.
  3. Submit the opalis.csr file to the certification authority.
Submitting the certification request to a Microsoft internal CA.
Logon the web enrollment page for the CA (the following screenshots refer to a Windows 2003 based CA but the same applies to a Windows 2008 based one)
image
Choose advanced certificate request
image
Submit a certificate request … file
image
Copy and paste the content of the csr file you generated opalis.csr (it’s a text file you can open with notepad, you must copy the entire content)
image
download the certificate and let’s call it opalis.cer.
From the same web site, download the root CA certificate in DER format and the Sub CA certificate in DER format, you’ll need them to use the SSL certificate. Let’s assume you named the three certificates rootca.cer, subca.cer, opalis.cer (the latter is the SSL certificate).
Importing the certificate into Java store and enabling the Operator Console
  1. When you receive the certificate from the certification authority, import it using the following commands:
    "%JAVA_HOME%\bin\keytool" -import -Alias RootCA -keystore "%JAVA_HOME%\jre\lib\security\opalis" -trustcacerts -file rootca.cer
    "%JAVA_HOME%\bin\keytool" -import -Alias SubCA -keystore "%JAVA_HOME%\jre\lib\security\opalis" -trustcacerts -file subca.cer
    "%JAVA_HOME%\bin\keytool" -import -alias Opalis -keystore "%JAVA_HOME%\jre\lib\security\opalis" -file opalis.cer
    The certificate is added to the JAVA cacert certificate store.
Next step: Enable Operator console access using HTTPS
To enable Operator Console access using the HTTPS protocol
  1. Open the \server\default\deploy\jboss-web.deployer\server.xml file.
Uncomment the HTTPS protocol information in the server.xml file. The resulting file should look similar to:


address="${jboss.bind.address}"
maxThreads="250" maxHttpHeaderSize="8192"
emptySessionPath="true" protocol="HTTP/1.1"
enableLookups="false" redirectPort="8443" acceptCount="100"
connectionTimeout="20000" disableUploadTimeout="true" />


address="${jboss.bind.address}"
protocol="HTTP/1.1"
SSLEnabled="true"
maxThreads="250"
scheme="https" secure="true"
clientAuth="false"
keystoreAlias="Opalis"
keystoreFile="${java.home}/lib/security/opalis"
keystorePass="changeit"
sslProtocol="TLS"     />
  1. Replace for each protocol with the actual port numbers you will use. The default port number for the Operator console is 5314. The default port number for https is 8443.
  2. To turn off a protocol, comment out the connection string of the protocol that you want to block using after the string. Turning off a protocol means that users cannot access the Operator console using that protocol.
  3. Copy the server folder from \offline\protocol\https to .
  4. Modify the application.xml file located at \server\default\deploy\OpsConsoleApp-1.0.ear\ME TA-INF\application.xml by changing
    OpConsoleWebService-1.0.jar to OpConsoleWebServiceSSL-1.0.jar.
  5. Modify the security-constraint section of the \server\default\deploy\OpConsoleWebServiceBridge-1.0.war\WEB-INF\web.xml file to the following:


    SecuredAll
    /*

    CONFIDENTIAL


  6. Restart JBoss to load the new server.xml settings.
- Daniele
This posting is provided "AS IS" with no warranties, and confers no rights.

Happy New Year

Dec 21, 2010

Great New Reporting Documentation for SCOM Published

http://technet.microsoft.com/en-us/library/gg508710.aspx
Covers the following:
  • Custom Reporting Overview
  • Setting Up the Environment
  • Creating Custom Reports
  • Data Warehouse Schema
  • Inside a Generic Report
  • Custom Report Queries

Test a remote SQL Connection very quickly and easy

I ran across a very useful MSDN blog post today and thought I’d share it. It explained a very quick and easy way to test a SQL connection and verify if you can logon with a specified account.
Here’s how:


Go to any folder on the system from where you want to test the connection, and create a new file


 Then change the extension to .UDL


 When you open that up you can easily see any SQL server within your reach


And then easily test the connection for a specified account (is the case the Windows Integrated) by just opening the database list, or pressing Test Connection


I think this is a very usefull way to quickly check a connection without having to configure or install anything.

Dec 14, 2010

Mark Cochrane's RegKeyToMof v2.5

Mark has updated his excellent RegKeytoMof utility for custom regkey MOF edit creations. The coolest part about it is a better method of pulling in registry keys from the 64-bit registry section.
I'm in love with it, because of how the end result is that there is only 1 table and 1 view in your database, making report writing that much easier (fewer joins).
Major kudos go to Jonas Hettich for figuring out the intricasies of how this type of mof edit works.
This blog entry will step through how to use RegKeytoMof to create a (fictitious) custom mof entry for "ABCStuff"
Below is a screen shot of the registry of a x86 computer, and a x64 computer.

How to Use RegKeytoMof:


  1. While on either the x64 computer or the x86 computer, launch "RegKeyToMofv2.5.exe"
  2. Browse to "Software\ABCStuff"
  3. Change the ClassGroup and ClassName to be values you want
    a. For me, I always change the group to be "CUSTOM", however, if you work for ACME Corporation, you may want to change it to "ACMECorp" for example.  It's really simply a label.
    b. Change the ClassName to be something unique, and no spaces is recommended.  For this edit, I'm going to use "ABCStuff"
  4. Check the box about "Enable 64bits"
Screen shot of the work so far:

Now we have a very, very close base.  Most of the time you could copy the contents of the tabs "SCCM Configuration.mof" and "SCCM sms_def.mof" directly to the bottom of your inboxes\clifiles.src\hinv files, and be golden.
However, for this particular mof edit, I made sure to add in some special cases, that might trip you up.  As mentioned, most of the time you won't have these special cases.
Three things:
  1. I'm asking for the value of the (Default) regkey.  that requires a manual edit.
  2. one of the values I want "MultiSZIWant", contains multiple strings.  In order to pull that information in nicely, there is another manual edit.
  3. one of the values I want "BinaryIwant", also needs a manual edit.
5. To adjust for the (Default) regkey, a label is required.  There are 6 places to put in that label; 4 places in configuration.mof, and 2 in sms_def.mof.
6. To adjust for the multiple string values, there is 4 places to put in braces [], 2 places in configuration.mof, and 2 in sms_def.mof.
7. To adjust for the binary value, there is 4 places to put in braces [], 2 places in configuration.mof, and 2 in sms_def.mof.
Attached is the completed mof edit. 
Notes: I decided to label the default value "TheDefault"  so search for that in the files to see how that was accomplished.  For the multi-values, search for the [] to see where those should be placed.
8. Now follow the wiki, on updating your mof files and confirming the edit worked:
9. Now that you have data in your database, here's a sample sql query, and the resulting report.
 
To interpret what that means...
   9a. workstation1 is a 32-bit OS, and as such, does not have WMI provider architechture that would try to report on 64-bit regkeys (this line in the
sms_def.mof edit:  SMS_Context_1("__ProviderArchitecture=64|uint32").  For that reason, there is only 1 row of data returned for workstation1.
   9b. workstation2 is a 64-bit OS, and does have both providerarchitechtures, 32 and 64.  So it will *attempt* to report on registry keys in both areas, that's why there are two rows of data, but the attributes that correspond to registry keys are null for those that don't exist, and contain data for the ones that do exist.
From a collection query creation standpoint, or from a reporting standpoint, having to look only in 1 location when you design your SQL or WQL queries is a very cool and timesaving thing.  Not only to you, but your database has 1 less table, view, and stored procedures

Dec 10, 2010

Obsolete objects - Reuse your ”Old” SCCM Client Objects in Mixed Mode

When ConfigMgr is configured in Mixed mode and client computers are re-imaged/re-installed; by default a new ConfigMgr computer object is created and the “old” computer object will become “Obsolete”. Well, this is by design, but it might become a problem. If the client has many direct collection memberships, these direct memberships will not be preserved when a new computer object is created. Therefore, these have to be re-created.
When ConfigMgr is configured in “Native Mode”, the client identity is automatically migrated since we are using certificates.


Well, with ConfigMgr, this problem can be handled. However, it is a manually process. In the “Site properties” dialog, on the “Advanced” tab, there is a section called “Conflicting records”. From here it can be configured how ConfigMgr should handle conflicting records. That is, clients with duplicate hardware Id’s. By default, it is configured to “Automatically create new client records for duplicate hardware IDs” as shown in the picture below.

clip_image002
And that is exactly what happens when a client is re-imaged; A new record is created and the “old” record is marked as “Obsolete”.
If “conflicting records” is configured to “Manually resolve conflicting records”, the ConfigMgr Admin must decide what to do with conflicting records. This is done through “Conflicting records” node in the ConfigMgr Admin Console (See picture below)
clip_image004
In the “Conflicting records” node, all conflicting records are listed. By right-clicking a record, 3 actions are exposed to the administrator: Merge, New, and Block.
Merge
This method combines the new detected record with the existing client record. This is equal to reusing the ConfigMgr “old” computer object. This is the method to use if we want to reuse the “old” object.

BlockThis method creates a new computer object, but it will be marked as blocked, and will remain unmanaged.

NewThis method creates a new computer object, and the “old” one will be marked as “obsolete”. This method is the default one, when “conflicting records” is configured to “Automatically create new client records for duplicate hardware IDs”.
It is important to note, that client computers having a conflicting record, will be unmanaged until the administrator actively decides what to do with the conflicting record (merge, block, create new).
So, by using the “Merge” method, we can reuse the “old” computer object. So that is very nice, but it is a manually process, and it might not be feasible to the administrator, that every time a client computer gets reinstalled, he or she have to go to the “conflicting records” node in the Admin Console and decide what to do with the computer object. So now the question is: “Can this be done automatically ?”….. Yes it can! However, the method is not documented by Microsoft, and neither can it be found it the ConfigMgr SDK, and there is a good reason: Security !!! I will get back to that later on.
However, I did a little research on the ConfigMgr server WMI-namespace, and I found an interesting class; the SMS_PendingRegistrationRecord class. I found that every time a “conflicting record” occurs, an instance of the “SMS_PendingRegistrationRecord” is created. Further, the SMS_PendingRegistrationRecord” has a method called “ResolvePendingRegistrationRecord” which takes 2 input parameters: ”SMSID” and ”action”. The “SMSID” parameter specifies the SMS Client GUID of the conflicting record, and the “action” parameter specifies what to do with the record: Merge, Block, or create new.
Input values for the “action” parameter
1 = Merge
2 = New
3 = Block
I have made a small sample script for resolving conflicting records. The script loops through all conflicting records and resolves them by using the “Merge” method. The script is just a small sample script, and provides no error handling or logging Smil
''''''''''''''''''''''''''''''''''''''''''''''''''''''''''''''''''''''''''''''''''''''''''''''''''''''''''''''''''''''''''''''''''''''''''''''''''''''''''''''''''''''''''''''''''''''''''''''''''''''''''''''''''''''''''''''''''''''''''''''''''''''''''
Dim swbemLocator
Dim swbemServices

Main()
Sub Main()
Dim oProviderLocation
Dim oLocation
Dim oReg
Dim oPendingRegs
    Set swbemLocator = CreateObject("WbemScripting.SWbemLocator")
    swbemLocator.Security_.AuthenticationLevel = 6 'Packet Privacy.
    Set swbemServices = swbemLocator.ConnectServer(".", "root\SMS")
    Set oProviderLocation = swbemServices.InstancesOf("SMS_ProviderLocation")
    For Each oLocation In oProviderLocation
        If oLocation.ProviderForLocalSite = True Then
            Set swbemServices = swbemLocator.ConnectServer(oLocation.Machine, "root\sms\site_" + oLocation.SiteCode)
        End If       
    Next

    Set oPendingRegs = swbemServices.ExecQuery("SELECT * FROM SMS_PendingRegistrationRecord")
    For Each oReg In oPendingRegs
        Resolve 1, oReg.SMSID
    Next

End Sub
Sub Resolve(action, SMSID)
Dim InParams
    Set InParams = swbemServices.Get("SMS_PendingRegistrationRecord").Methods_("ResolvePendingRegistrationRecord").InParameters.SpawnInstance_
    InParams.Action = action
    InParams.SMSID = SMSID

    swbemServices.ExecMethod "SMS_PendingRegistrationRecord","ResolvePendingRegistrationRecord", InParams
End Sub

''''''''''''''''''''''''''''''''''''''''''''''''''''''''''''''''''''''''''''''''''''''''''''''''''''''''''''''''''''''''''''''''''''''''''''''''''''''''''''''''''''''''''''''''''''''''''''''''''''''''''''''''''''''''''''''''''''''''''''''''''''''''''
I have tested this script and implemeted it at a couple of customers, and found no problems with it. The script is executed on the site server on regular basis (every 10 minutes or so) by using a “Scheduled Task”.
The script can not be run as a part of a Task Sequence, since there will be a delay from when the SMS Agent Host is installed on the client computer, until til it appears in the "Conflicting records" node.
As mentioned earlier; this method is not documented or supported by Microsoft and for a good reason: Automatically merging records introduces a security risk: If a rogue user that knows or guesses the hardware ID of a previously assigned client computer, this person could take over the identify of that client and gain access to the SCCM site. It would be very difficult to detect this if records are automatically merged. 
So if you want to reuse your “old” ConfigMgr computer objects, you might consider using this script. Just keep the security risk in mind.